


J'ai un Imprimante UV DTF? Parlons-en entretien! Que vous soyez débutant ou professionnel aguerri, savoir comment entretenir votre imprimante vous permettra de garder votre calme. Je vais tout expliquer en termes simples, partager quelques conseils de dépannage et peut-être même vous apprendre quelques astuces que vous n'avez jamais entendues auparavant. Prêt à devenir un expert en entretien d'imprimantes UV DTF ? Ensemble, nous allons voir comment repérer les problèmes tôt, résoudre les problèmes courants et garder votre imprimante en bon état de fonctionnement.
1. Comprendre l'imprimante UV DTF 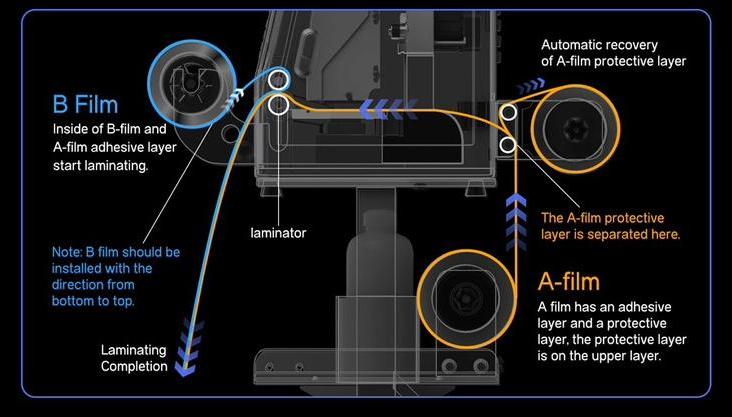
Le processus d'impression UV DTF peut être divisé en plusieurs étapes. Chaque étape utilise différents équipements et dispositifs.
|
Pas |
Équipement |
Description |
|
1. Impression d'images |
Encre, tête d'impression, Une entrée de film |
Assurez-vous de la compatibilité de l'encre avec les matériaux et ajustez les paramètres de l'imprimante (par exemple, la résolution, le volume d'encre). L'imprimante pulvérise de l'encre uniformément sur le film en fonction du fichier image, formant l'image sur le côté adhésif du film A. |
|
2. Durcissement du motif |
Système de durcissement (lampe UV) |
Utilisez une lampe UV pour irradier la zone d'image imprimée, durcissant l'encre et garantissant qu'elle adhère fermement au film. |
|
3. Lamination de film AB |
Film de série B, Pressage à chaud appareil de presse à chaud |
Le film A et le film B sont laminés, et un Pressage à chaud Le dispositif de presse à chaud est utilisé pour s'assurer que les deux films sont fermement liés, garantissant que le motif est plat et a une forte adhérence. |
|
4. Sortie de film terminée |
Sortie, Système de rembobinage |
Sortir le film fini laminé par le dispositif de sortie ou, s'il y a un rembobineur supplémentaire, enrouler le film fini. |
Système d'alimentation : cartridge d'encre - tube d'encre - sac d'encre - tête d'impression - imprimer
2. FAQ sur l'entretien de l'UV DTF
2.1 Comment garder l'impression UV DTF plate ? Comment gérer le film de déchets ?
Analyse des causes :
-
Si le film n'est pas correctement aligné ou soumis à une tension inégale, cela peut provoquer le pliage ou le froissement du film pendant l'impression, affectant ainsi l'effet d'impression.
-
Une manipulation incorrecte des films usagés peut provoquer des blocages d'équipement ou un gaspillage de matériel.
Solution:
-
Assurez-vous que le film est correctement aligné dans le système d'alimentation pour éviter les plis ou un étirement excessif.
-
Ajustez l'amortissement du chemin du film et du collecteur de papier électrique pour garantir que le film reste plat.
2.2 Pourquoi y a-t-il un écart dans la position d'impression des graphiques ?
Analyse des causes :
-
L'imprimante peut avoir des erreurs de positionnement ou un chargement incorrect du matériau, ce qui entraîne un décalage de la position de l'image imprimée.
-
Les paramètres du logiciel d'impression peuvent être incorrects.
Solution:
-
Vérifiez et assurez-vous que le film est correctement aligné dans l'imprimante pour éviter le décalage. Ajustez la tension et l'alimentation du film. chemin du matériau.
-
Ajustez la position du bord blanc pour vous assurer que l'image est correctement placée dans la zone d'impression. Si nécessaire, recalibrez l'imprimante.
2.3 Pourquoi la lampe UV ne fonctionne-t-elle pas ?
Analyse des causes :
-
La lampe UV peut être endommagée ou vieillie en raison d'une utilisation prolongée, ce qui entraîne un dysfonctionnement.
-
Il peut y avoir un problème avec la connexion électrique ou le système de durcissement UV.
-
Système de refroidissement endommagé
Solution:
-
Vérifiez la lampe UV pour détecter des signes de dommage et confirmez qu'elle fonctionne correctement. Si l'ampoule est endommagée, remplacez-la par une nouvelle.
-
Vérifiez l'alimentation électrique et les connexions électriques pour vous assurer que l'alimentation de la lampe UV est normale. Nettoyez régulièrement la zone de la lampe UV pour garder l'équipement propre et éviter la surchauffe ou l'accumulation de poussière.
-
Vérifiez si le ventilateur de refroidissement fonctionne correctement et remplacez-le à temps s'il ne fonctionne pas.
2.4 La finale autocollant le décalque n'est pas assez collant ?
Analyse des causes :
-
Traitement de surface inapproprié : Si la surface du matériau n'est pas correctement préparée, l'encre ne peut pas adhérer efficacement.
-
Matériaux incompatibles : Assurez-vous que l'encre utilisée est compatible avec le matériau.
-
Qualité d'encre médiocre : L'utilisation d'encre inférieure peut entraîner une adhérence insuffisante.
-
Qualité des consommables médiocre : Les consommables sont stockés trop longtemps ou deviennent humides, ce qui entraîne une adhérence insuffisante.
-
Température basse du rouleau de chauffage : entraînant un transfert de motif incomplet et une adhérence insuffisante.
-
Temps de pressage court : Un temps de durcissement trop court ou trop long du rouleau chauffant peut causer des problèmes d'adhérence.
Solution:
-
Assurez-vous d'un traitement de surface approprié et choisissez des matériaux compatibles avec l'encre.
-
Utilisez de l'encre UV DTF de haute qualité et ajustez le temps de durcissement si nécessaire.
-
Attendez que la température du rouleau chauffant atteigne la température appropriée (60℃-80℃) avant d'imprimer.
2.5 Pourquoi n'y a-t-il pas d'encre blanche dans l'impression ?
Analyse des causes :
-
Problème d'image : Le revêtement de couleur spot est-il fait correctement ?
-
Problème de paramètre logiciel : Le paramètre approprié est-il sélectionné ? Le paramètre de l'imprimante peut ne pas activer l'encre blanche, ou le fichier ne configure pas correctement la couche d'encre blanche.
-
Problème de machine : La cartouche d'encre n'a pas assez d'encre, le sac d'encre est-il plein, ou la buse est-elle en bon état ?
Solution:
-
Vérifiez les paramètres de l'image en couleur spot et vérifiez si la couche d'encre blanche dans le fichier d'impression est correctement configurée.
-
Le logiciel sélectionne la couleur de spot
-
Vérifiez la cartouche d'encre blanche et la buse
-
Assurez-vous que l'encre blanche est activée dans les paramètres de l'imprimante et ajustez suffisamment les paramètres d'encre blanche de l'imprimante pour garantir un flux d'encre fluide (si c'est une vieille machine : vérifiez si elle n'a pas été utilisée depuis longtemps pour éviter la précipitation de l'encre).
2.6 Pourquoi l'impression UV DTF est-elle décolorée ou devient-elle floue ?
Analyse des causes :
-
Paramètres d'encre incorrects : Un volume d'encre ou des paramètres de buse incorrects peuvent provoquer une décoloration.
-
Curation incorrecte : Un temps de séchage insuffisant sous la lampe UV ou une intensité trop faible peuvent entraîner un flou ou une décoloration de l'image.
-
Tête d'impression sale et obstruée : Une tête d'impression obstruée affectera le flux d'encre et entraînera une dégradation de la qualité d'image.
Solution:
-
Vérifiez les paramètres d'encre pour vous assurer que la quantité appropriée d'encre est pulvérisée.
-
Ajustez les paramètres de durcissement pour vous assurer que l'image est complètement durcie.
-
Nettoyez régulièrement la tête d'impression pour garantir un flux d'encre fluide.
3. Que devrais-je faire si je rencontre de nouveaux problèmes ?
Même avec les meilleurs soins, des problèmes comme les taches d'encre, les images floues, les décalages de couleur, les plis du film et la mauvaise adhérence peuvent parfois survenir lors de l'impression UV DTF. Lorsqu'ils se produisent, il est important de rester calme, de prendre un moment pour réfléchir et de résoudre le problème de manière systématique. En général, la cause peut être retracée soit au logiciel, soit au matériel.
3.1 Inspection de logiciel
|
Optimisation |
Techniques d'optimisation |
|
Résolution d'impression |
Ajustez la résolution d'impression pour trouver un équilibre entre la qualité et la vitesse d'impression. Une haute résolution rend l'image plus claire mais ralentit la vitesse d'impression. |
|
Volume d'encre |
Évitez d'utiliser une encre excessive pour prévenir les bavures et garantir des impressions cohérentes. Ajustez le volume d'encre si nécessaire pour assurer que la densité de couleur est appropriée. |
|
Température et temps de durcissement |
Ajustez les paramètres de durcissement pour améliorer l'adhérence entre l'encre et le matériau, renforçant la durabilité de l'impression et empêchant les bavures. |
|
Ajustements Mécaniques |
Inspectez et entretenez régulièrement les pièces mobiles de l'imprimante, telles que la tête d'impression, le support et le système d'alimentation en film, pour garantir un bon alignement et un bon fonctionnement. |
3.2 Sélection du matériel
|
Problèmes courants |
Causes potentielles |
Étapes de dépannage |
|
Lignes d'impression |
- Objets étrangers rayant l'image - Mauvaise condition de la tête d'impression |
1. Vérifiez s'il y a des objets étrangers sur la plateforme. 2. Nettoyez et entretenez la tête d'impression pour garantir que les buses ne sont pas obstruées. |
|
Image floue |
- Alimentation de film incohérente - Problèmes mécaniques |
1. Vérifiez et calibrez l'alignement de la tête d'impression pour vous assurer qu'elle est dans la bonne position. 2. Améliorer le chargement et le tensionnement du film pour éviter le désalignement du film. 3. Vérifiez et réparez les composants de l'imprimante pour éliminer les pannes mécaniques. |
|
Incohérence des couleurs |
- Profil de couleur inexact - Pénurie d'encre - Mélange des couleurs - état de la tête d'impression |
1. Vérifiez et mettez à jour le profil de gestion des couleurs pour garantir des paramètres de couleur appropriés. 2. Remplissez l'encre pour éviter les couleurs manquantes. 3. Calibrez régulièrement l'imprimante pour garantir une impression des couleurs précise. |
|
Rides du film |
- Chargement incorrect du film - Problèmes de tension dans le chemin du film - Facteurs environnementaux (humidité) |
1. Suivez les directives de chargement du film pour garantir un placement correct du film. 2. Ajustez les guides d'alimentation du film et les tendeurs pour maintenir une tension appropriée. 3. Contrôlez les conditions environnementales pour garantir que la température et l'humidité sont appropriées. |
|
Mauvaise adhérence |
- Adhérence de l'encre insuffisante - Application de revêtement incorrecte - Incompatibilité des matériaux - Température de presse à chaud basse et court temps |
1. Assurez-vous que la surface du film est correctement préparée et que le revêtement est appliqué uniformément. 2. Utilisez un film de haute qualité conçu spécifiquement pour le DTF UV. 3. Ajustez la couverture d'encre et les paramètres de durcissement pour garantir une bonne adhérence avec le film. 4. Attendez que le rouleau chauffant atteigne la température appropriée avant d'imprimer et réglez la bonne vitesse. |
|
Problèmes d'encre blanche |
- Buses d'encre blanche obstruées - Flux d'encre blanche incohérent - Sédimentation des pigments dans l'encre |
1. Nettoyez et débouchez la tête d'impression à encre blanche pour garantir un flux d'encre fluide. 2. Remuez et faites circuler régulièrement l'encre blanche pour éviter la sédimentation. 3. Utilisez des produits d'entretien spécialisés pour l'encre blanche afin de maintenir sa qualité. |
4. Pourquoi est-il si important d'entretenir régulièrement votre imprimante UV DTF ?
Incorporer l'entretien de routine dans votre flux de travail d'impression UV DTF prolongera non seulement la durée de vie de votre imprimante, mais garantira également que chaque impression soit de haute qualité. En nettoyant régulièrement la tête d'impression, en empêchant l'encre de sécher, en maintenant l'humidité sur le film de transfert et en veillant à un espace de travail propre, vous pouvez éviter des réparations coûteuses et réduire les temps d'arrêt.
|
Avantages |
Description |
|
Prévenir les obstructions et les blocages |
Un entretien régulier prévient l'accumulation d'encre et le blocage des pièces de l'imprimante. |
|
Prolonger la durée de vie de l'imprimante |
Un entretien approprié réduit le besoin de réparations, prolongeant la durée de vie de l'imprimante. |
|
Réduire les coûts |
La détection précoce des problèmes aide à éviter des frais de réparation coûteux. |
|
Optimiser l'utilisation de l'encre |
Une imprimante bien entretenue utilise l'encre de manière plus efficace, réduisant le gaspillage. |
|
Maintenir la cohérence des couleurs |
Des pièces propres garantissent des couleurs d'impression précises. |
|
Réduire les défauts d'impression |
Maintenir la propreté réduit les erreurs et améliore la qualité d'impression. |
|
Prévenir la contamination |
Une imprimante propre aide à éviter que la poussière n'affecte la qualité d'impression. |
|
Améliorer la fiabilité |
Un entretien régulier réduit le risque de défaillance de l'équipement. |
5. Conseils d'entretien UV DTF
5.1 Entretien quotidien de la tête d'impression
Après le travail :
Testez la tête d'impression et conservez les bandes d'encre de test pour comparaison le lendemain.
Placez la tête d'impression sur le tampon d'encre pour éviter le colmatage causé par le séchage de l'encre.
Avant le travail :
Testez la tête d'impression pour vous assurer que l'encre s'écoule correctement et nettoyez la tête d'impression si nécessaire.
5.2 Gardez l'imprimante UV DTF propre
Essuyez la surface de l'imprimante pour enlever la poussière et les débris.
Gardez la zone de travail propre pour éviter la contamination et les dommages aux composants de l'imprimante.
5.3 Stockage et entretien des consommables
Stockage du film AB : Conservez dans un endroit sec et frais, évitez la lumière directe du soleil et faites attention à l'humidité. Vérifiez le film avant l'impression pour vous assurer qu'il est exempt d'humidité et de plis.
Stockage de l'encre UV : Évitez l'exposition à la lumière et vérifiez régulièrement l'encre pour garantir sa fluidité et sa qualité. L'encre de petite capacité est adaptée à la production à faible volume pour réduire le risque d'exposition à long terme à l'encre.
Remarques :
-
L'encre UV est volatile et ne peut pas être exposée à l'air pendant longtemps.
-
Toujours bien fermer les bouteilles d'encre immédiatement après utilisation.
-
Gardez les têtes d'impression correctement protégées lorsqu'elles ne sont pas utilisées. Conservez les encres dans un environnement frais et sombre.
-
Vérifiez régulièrement les scellés des conteneurs pour tout dommage.
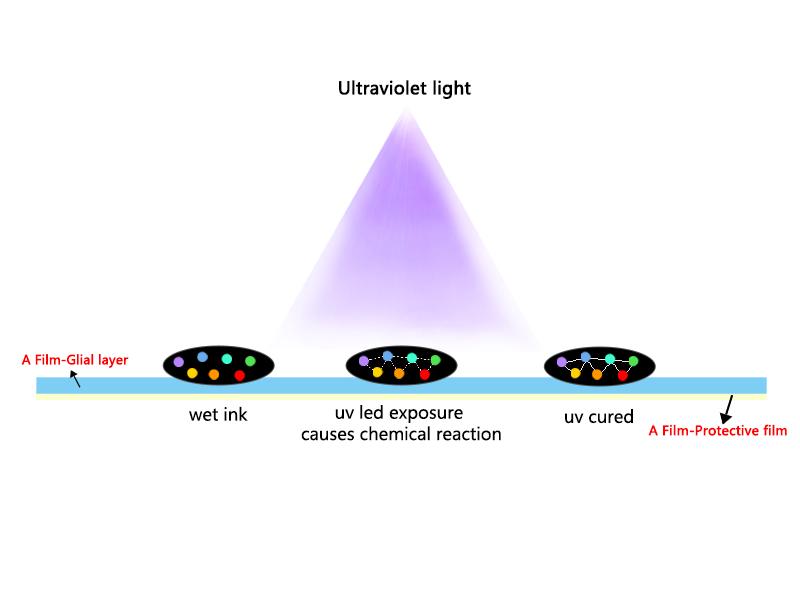
Processus de durcissement à l'encre UV
6. Résumé
Maintenir votre imprimante UV DTF est crucial pour garantir une qualité constante et une longévité. En suivant les bonnes directives d'entretien et en restant proactif avec un entretien régulier, vous pouvez éviter les problèmes courants et garder votre processus d'impression en bon état.
N'oubliez pas, vous n'êtes pas seul dans ce parcours. Notre équipe de support est toujours prête à vous aider à relever tous les défis d'impression. Vous avez des questions ? N'hésitez pas à nous contacter – nous sommes là pour garantir le succès de votre entreprise d'impression UV DTF.


